Introduction
Dans le monde de la construction, en constante évolution, il est impossible d'être trop efficace, trop prudent ou trop fiable. Système d'échafaudage Kwikstage Kwikstage permet tout cela, et bien plus encore ! Ce système d'échafaudage modulaire et préfabriqué, conçu à l'échelle mondiale, se distingue par sa rapidité de montage et de démontage : plus rapide encore que les systèmes traditionnels à tubes et raccords, lourds et encombrants. Le terme « Kwikstage » a été choisi pour souligner la rapidité de son installation, supérieure à celle de toute autre méthode. Plus largement, son utilisation permet de réaliser des économies considérables de temps et de main-d'œuvre sur chantier ; un avantage concurrentiel indéniable.
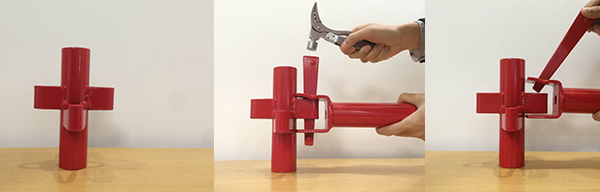
Kwikstage se distingue par son système de fixation par coin unique. Chaque composant s'emboîte parfaitement avec les autres, permettant un ajustement précis pour le clouage et le réalignement au fur et à mesure – il suffit d'abattre une tige verticale avec un marteau – éliminant ainsi le besoin de fixations, de clés ou de boulons. Ce système garantit un montage plus sûr et plus facile, tout en offrant une structure très robuste et stable.
Que vous soyez chef de projet, chef de chantier ou ouvrier qualifié, une fois que vous aurez compris comment monter correctement les échafaudages Kwikstage, vous pourrez aider vos équipes à bénéficier d'un environnement de travail sûr et productif. Ce guide est une version complète expliquant comment procéder. monter l'échafaudage Kwikstage des descriptions des composants aux contrôles de sécurité.
Partie 1 : Qu'est-ce que l'échafaudage Kwikstage ?
Comprenez bien les éléments avant de commencer la construction. Kwikstage n'est pas un simple assemblage de poteaux ; c'est un échafaudage conçu sur mesure. Les pièces essentielles sont standardisées, durables et s'emboîtent parfaitement.
Composantes clés :

- Normes (Verticales) : Il s'agit des principaux poteaux porteurs verticaux, munis de pièces en forme de V soudées à intervalles réguliers (généralement tous les 500 mm ou 1 000 mm, conformément aux normes industrielles). Ces pièces sont essentielles car elles servent à la fixation d'autres composants.
- Grands livres (horizontaux) :Ce sont des éléments horizontaux reliant les montants et assurant la longueur de la travée d'échafaudage. Les têtes de coin s'emboîtent dans les rainures en V des montants.
- Traverses : Elles relient les montants sur toute la largeur de la travée et supportent les planches de la plateforme de travail.
- Bras diagonaux :Essentiel pour la stabilité et la rigidité de l'ensemble de la structure, il empêche effectivement l'échafaudage de se balancer ou de basculer latéralement.
- Planches d'acier : Les plateformes de travail sont sûres pour le personnel et les matériaux, et elles sont antidérapantes.
- Piquets de base et semelles : Les vérins de base s'ajustent pour permettre à l'échafaudage d'être de niveau sur un sol inégal, tandis que les semelles répartissent la charge et empêchent le poids des montants de s'effondrer ou de s'enfoncer dans le sol inégal.
La standardisation de ces pièces permet un assemblage rapide et précis, réduisant considérablement les risques d'erreur humaine par rapport aux systèmes traditionnels.
Partie 2 : Le processus d'érection : Guide de sécurité étape par étape
Le processus de montage des échafaudages Kwikstage est une séquence exacte et répétable qui doit être suivie scrupuleusement afin de garantir un échafaudage sûr et structurellement solide.
Étape 1 : Inspection préalable du site et des composants
La sécurité commence avant même la pose de la première pièce.
- Évaluation du site :Une personne compétente doit évaluer le terrain qui accueillera l'échafaudage. Celui-ci doit être ferme, de niveau et capable de supporter le poids de l'échafaudage.
- Vérification des composants :Vérifiez que tous les montants, registres et supports ne sont pas endommagés, notamment par des bosses, des déformations ou des fissures. N’utilisez pas les éléments endommagés.
- Compétences de l'équipe :Vérifiez que tous les membres de l'équipe possèdent la formation et la certification nécessaires pour travailler avec Kwikstage.
Étape 2 : Installation de la base
La base est primordiale. Un échafaudage correctement nivelé est un échafaudage sûr.
- Localiser les semelles : Positionnez les planches de semelle exactement comme indiqué sur le plan de l'échafaudage.
- Installer les prises de base : Placez les vérins de base réglables sur la semelle. Utilisez un niveau à bulle pour vous assurer que la hauteur réglable des vérins et leur hauteur sont bien verticales et de niveau afin de compenser les variations du terrain.
- Positionner d'abord les normes : Placez les premiers standards directement sur les supports de base.
Étape 3 : Construction du premier compartiment (ascenseur)
C'est ici que la magie opère.
- Connecter les registres :Assemblez les montants en insérant les têtes de coin des traverses dans les encoches en V. Utilisez un marteau lourd pour enfoncer fermement les coins et verrouiller l'assemblage.
- Ajouter des traverses :Fixez les traverses pour relier les montants sur toute la largeur de la baie.
- Vérifier et équerre :Avant de continuer, utilisez un mètre ruban et un niveau à bulle pour vérifier que la travée est d'équerre et de niveau.
Étape 4 : Installation des haubans diagonaux
Le contreventement est ce qui rigidifie la structure.
- Fixer les supports :Fixez des entretoises diagonales aux profilés en V des montants, en formant un angle, à la fois sur la face de l'échafaudage et périodiquement aux extrémités.
- Importance:L'une des principales causes d'instabilité des échafaudages est la mauvaise installation des étais. Les étais sont essentiels.
Étape 5 : Mise en place des plateformes et installation des dispositifs de sécurité
Une fois le cadre fixé, vous pouvez créer la surface de travail.
- Installation des cartes :Placez les planches d'acier sur le dessus des tableaux arrière. Assurez-vous qu'elles sont bien en place et ne bougent pas.
- Installer des garde-corps :Sur une plateforme de travail de plus de 2 mètres, installez un garde-corps supérieur et un garde-corps intermédiaire.
- Installer les plinthes :Il est conseillé d'utiliser des plinthes autour du bord de la plateforme pour empêcher les outils et les matériaux de rouler et de tomber.
Étape 6 : Extension vers le haut (construction des ascenseurs suivants)
Pour aller plus haut, il faut répéter le processus.
- Normes de connexion :Utilisez des raccords pour connecter le prochain ensemble de normes au-dessus du premier.
- Répéter:Suivez la même procédure pour raccorder les lisses, les traverses et les contrefiches diagonales.
- Liens :Il s'agit d'une étape cruciale et non négociable. À mesure que l'échafaudage s'élève, il doit être solidement ancré au bâtiment ou à une structure solide à intervalles réguliers afin d'éviter tout effondrement. La fréquence de ces ancrages est déterminée par le plan de conception de l'échafaudage.
Partie 3 : Règles et réglementations essentielles en matière de sécurité
Le montage d'échafaudages ne se résume pas à l'assemblage d'éléments. Il s'agit aussi de respecter les protocoles de sécurité.
- Conformité réglementaire :Respectez toujours les réglementations nationales et locales, telles que les normes OSHA aux États-Unis ou la norme AS/NZS 1576 en Australie.
- Inspections régulières :Les échafaudages doivent être inspectés avant chaque utilisation et après tout événement susceptible d'affecter leur intégrité, comme une tempête ou des vents violents.
- Accès et sortie :Veillez à ce qu'il existe un moyen sûr et dégagé d'accéder à l'échafaudage, comme une échelle ou un escalier désigné.
- Démontage en toute sécurité :Une fois le travail terminé, l'échafaudage doit être démonté dans l'ordre inverse de son montage, en commençant par le haut.
Conclusion
Le montage d'échafaudages Kwikstage est un processus sûr et efficace lorsqu'il est réalisé avec les connaissances appropriées et une grande attention aux détails. Sa conception et sa facilité d'utilisation en ont fait un élément incontournable du secteur de la construction moderne. En suivant une procédure claire et détaillée et en privilégiant la sécurité à chaque étape, vous pouvez construire une structure stable et fiable qui protège votre équipe et votre projet.
Besoin d'échafaudages Kwikstage pour votre prochain projet ? Nous proposons une gamme complète de haute qualité. Composants Kwikstage à vendre, ainsi que des conseils d'experts pour garantir que votre projet soit réalisé de manière sûre et efficace. Contactez-nous Contactez-nous dès aujourd'hui pour obtenir un devis et découvrir comment nos solutions peuvent contribuer à votre réussite.
FAQ
Les échafaudages Kwikstage sont-ils sûrs ?
- Oui, c'est l'un des systèmes les plus sûrs disponibles lorsqu'il est installé par des professionnels certifiés et correctement entretenu.
En quoi diffère-t-il des échafaudages traditionnels ?
- Kwikstage est modulaire, utilise un système de fixation rapide par coin et est beaucoup plus rapide à monter et à démonter que les systèmes traditionnels à tubes et raccords.
Kwikstage peut-il être utilisé pour des projets de toutes tailles ?
- Oui, sa conception modulaire la rend adaptée aussi bien aux petits projets résidentiels qu'aux grands projets commerciaux.
Quel poids peut-il supporter ?
- La capacité de charge spécifique dépend de la configuration, mais le système est conçu pour supporter en toute sécurité plusieurs travailleurs et des matériaux lourds.


 en
en fr
fr es
es